- Swim Teach Home
- breaststroke swimming
- Learn Breaststroke Swimming Technique
How DO I Learn Breaststroke Swimming Technique Step-By-Step?
Hey there! If you’ve been wanting to learn breaststroke swimming technique - but feel a bit overwhelmed by all the moving parts - you’re not alone. Breaststroke can seem a little tricky at first. There’s a lot going on: the kick, the arms, the breathing, the timing. But don’t worry - I've got you.
This guide is built just for you. Whether you're a new swimmer or a swim teacher helping beginners with different swimming strokes, I’ll walk you through it all step-by-step. We'll keep things simple, clear, and totally doable.
Download a free copy of my Breaststroke Technique book as you go and keep it so that you can refer to the images and diagrams.
Ok, let's get started.

What is the correct body position for breaststroke?
First things first: how you move and glide through the water matters. Your body should be as flat and long as you can make it - like a superhero flying through the air!
Here’s what to focus on:
- Face in the water, arms stretched straight ahead
- your hands together and fingers closed
- Legs long and together
- Hips near the surface (don’t let them sink!)
- Head in line with your spine - don’t look forward or up
When you learn breaststroke swimming technique, a good body position helps you glide smoothly, and that means less effort and more energy saved.

For more detailed information about breaststroke body position, click here.
Download a Free Breaststroke Technique eBook
How do you kick properly in breaststroke?
When it comes to breaststroke kick for beginners, your legs are where most of the power comes from. The kick might feel odd at first, but once you get the hang of it, it’s super satisfying.
Try this:
- Bend your knees a bit and bring your heels up toward your bum.
- Turn your feet out slightly (like a duck).
- Whip your legs around in a circle, finishing with your feet pressed together and legs straight.
Think of it like drawing a heart shape with your feet. It’s quick and snappy, but not jerky. And don’t kick too wide - that can strain your knees.
Pro tip: Practice just the kick with a kickboard or float under each arm.
Knee problems? Click here for some knee-friendly breaststroke tips.
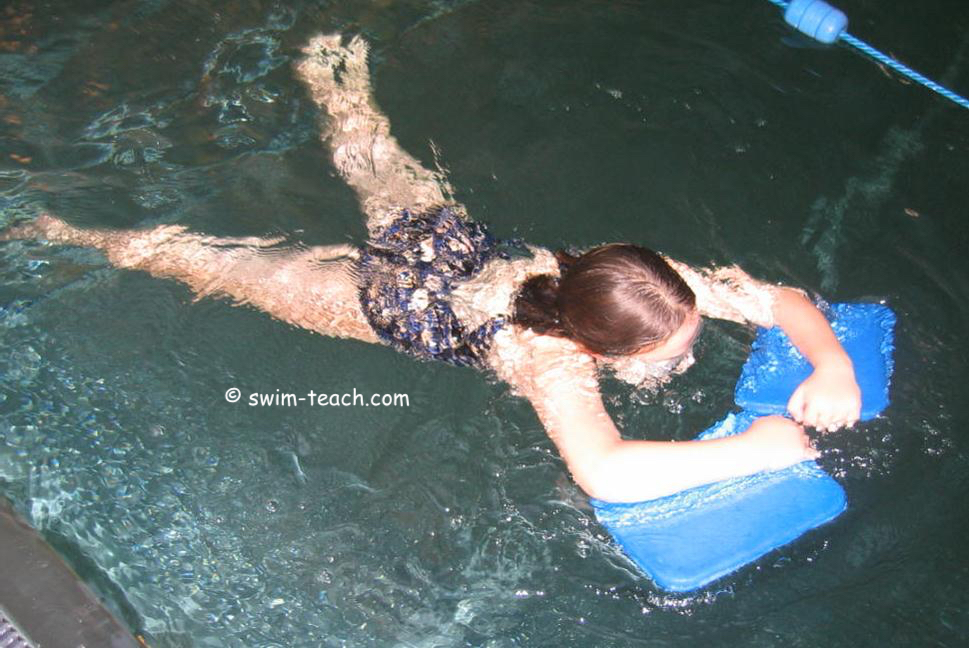
- Push away from the poolside with one foot, looking forward with your chin on the water surface.
- Draw your knees up underneath you keeping your legs and feet together and...
- ...turn out your feet, exposing the soles to the water behind you.
- Kick your feet out, around and back together, keeping your knees as close together as you can.
- As you get used to the action, add more power and acceleration to the movement so that it becomes more of a whip action.
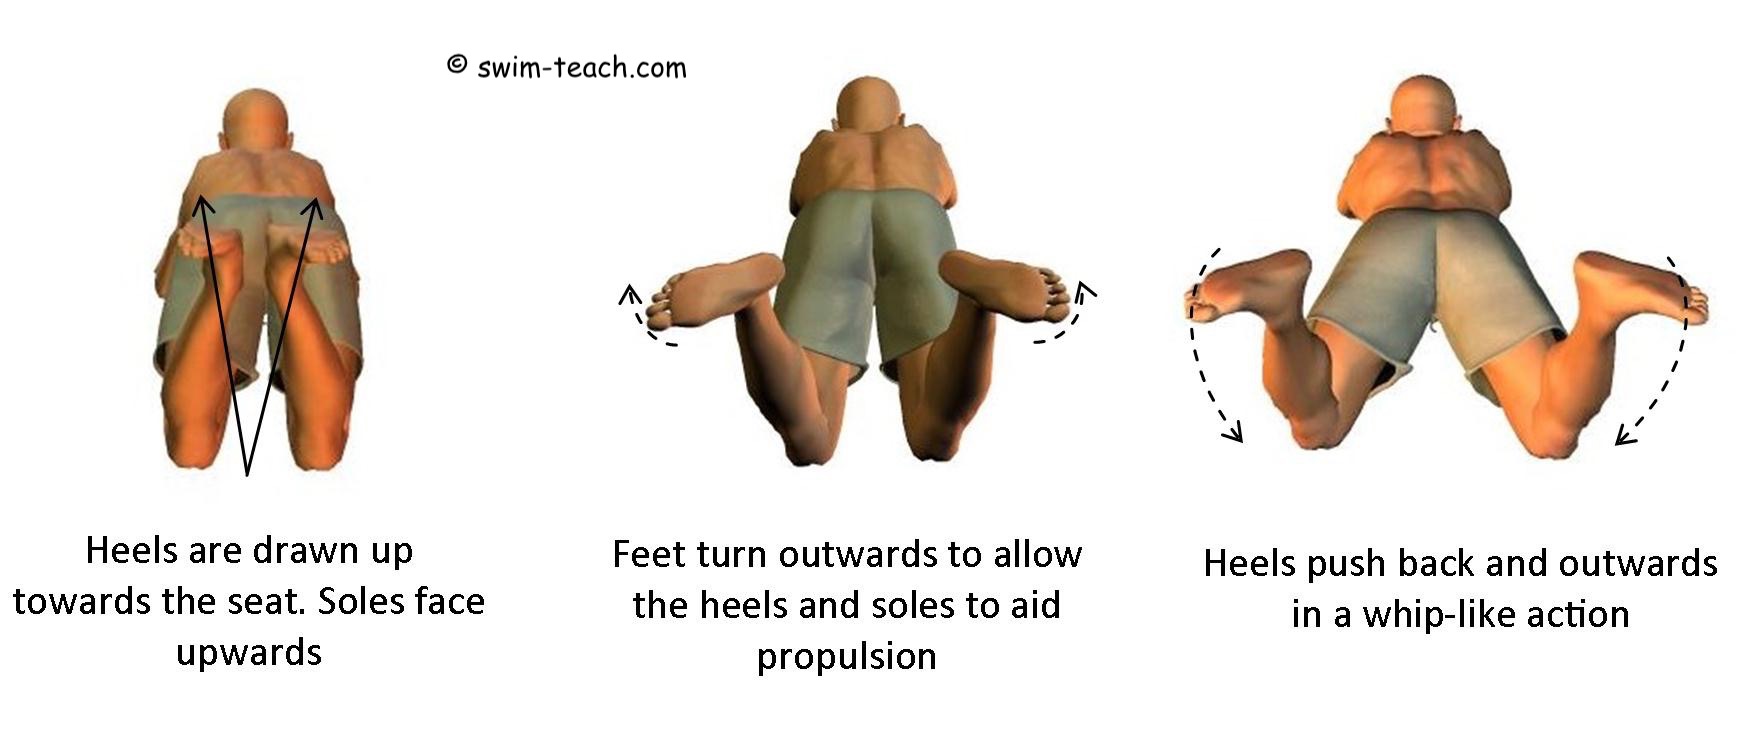
Ensure that:
- the legs kick around at the same time
- the feet turn outwards to allow them to push on the water
- the legs and feet return together and straight
For more in-depth knowledge about breaststroke kicking, click here.
What is the correct arm movement in breaststroke?
The arms help steer and keep you balanced, but they’re not your main source of power. Here’s how they work:
- Start with arms stretched out in front.
- Turn your hands out a little and pull them out and back toward your chest (like you’re scooping water).
- Bring your hands together and stretch them back out.
Your arms move in a circle - out, in, and forward. Don’t let your elbows come too high out of the water. Everything should feel smooth and controlled.
Pro tip: Try using a woggle under your arms and practice the technique slowly.
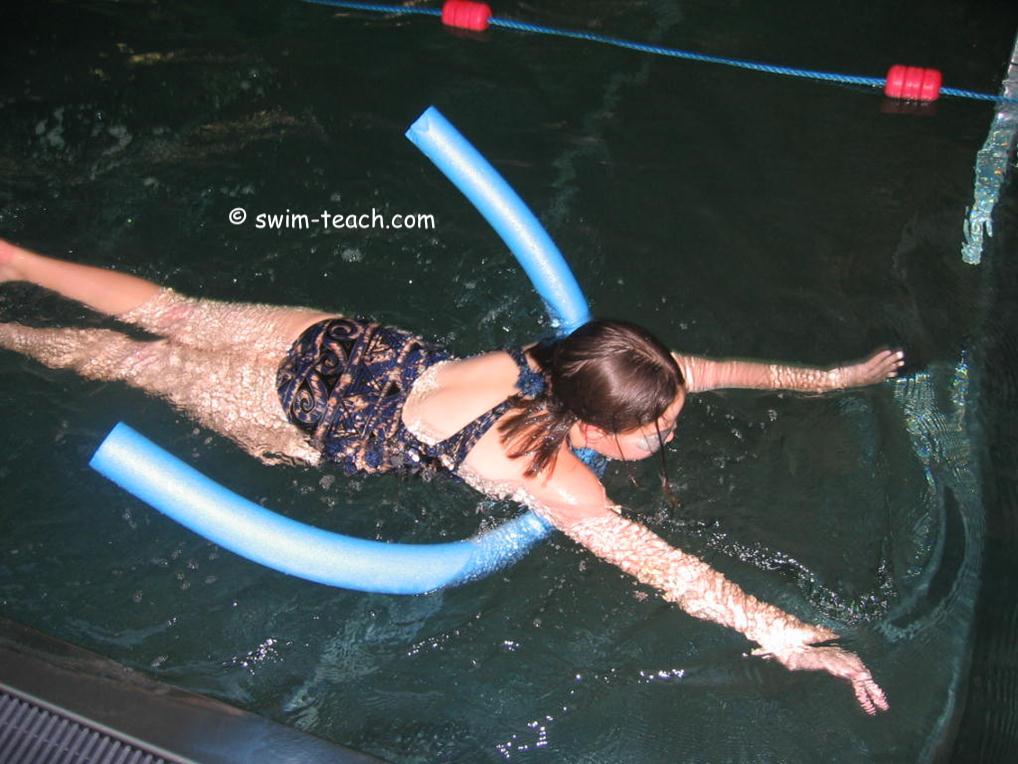
- Push gently away from the pool side with arms stretched out in front and together
- Keeping fingers together, pull the water around in a small circle, keeping your hands in front of you throughout the movement
- Allow your hands to scoop around and come together just under your chin
- Elbows tuck in (this part of the action is easier when practiced without the woggle)
- Both hands then stretch forwards, remaining together as they return to their starting position
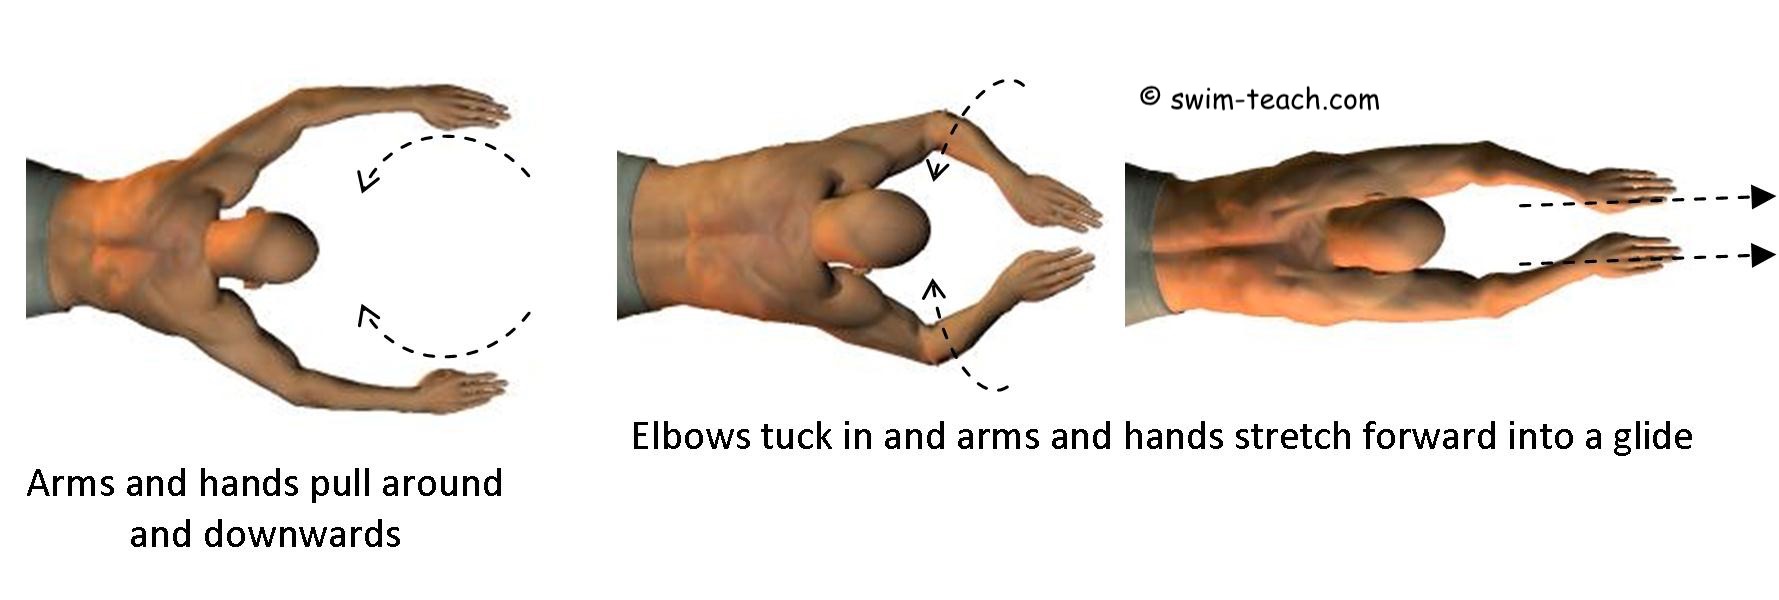
Ensure that you:
- Fingers remain together
- Hands and arms remain just under the surface throughout
- Hands do not pull wide apart
- Arms stretch forward to form a streamlined shape in front
For more details about each part of breaststroke arm technique, click here.
How do you breathe correctly in breaststroke?
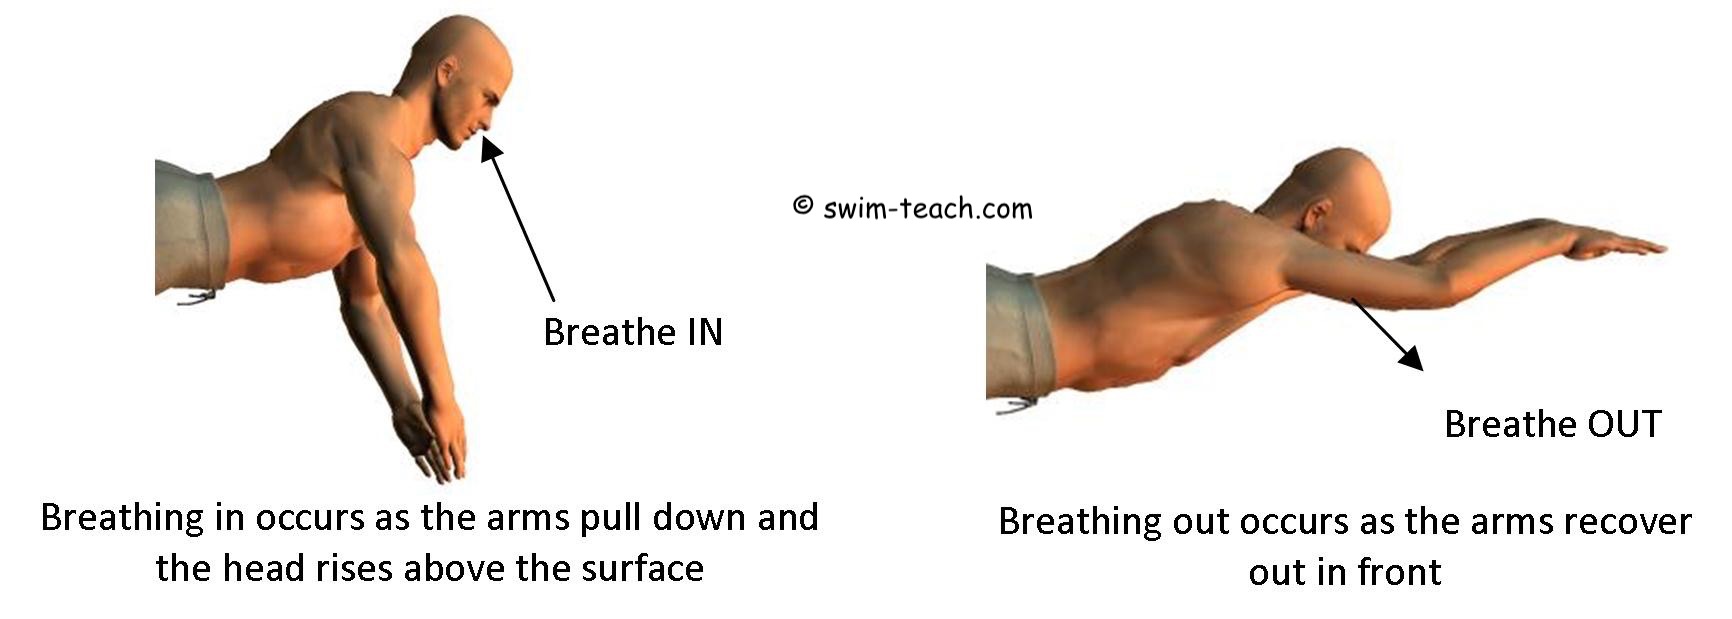
Breaststroke is the only stroke where you breathe during the arm pull. That’s great for beginners, but it’s easy to strain your neck if you're not careful.
Here’s the trick:
- Breathe in when your arms pull and your shoulders lift a little
- Don’t lift your chin - let your head follow your shoulders
- Blow bubbles into the water while you're gliding
Relax your neck and let the movement bring you up for air. If you really want to perfect the breathing rhythm and subtleties, check out the full guide on breathing technique for breaststroke, which goes into more detail.
Try this basic drill using a woggle to learn breaststroke breathing:
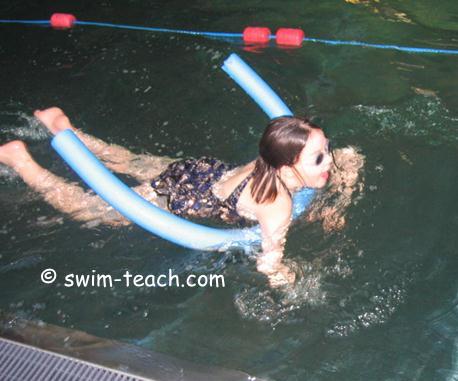
- Push away from the wall with face submerged and arms straight out in front
- Exhale slowly from your mouth, blowing small controlled bubbles as you glide
- Begin to the arm pull action by scooping your hands around and raise your head to look forward as you do
- As your mouth clears the water surface, begin to inhale and take in a new breath
- As the arms complete their movement and begin to stretch forwards, allow your face to submerge and begin to exhale again
- Repeat this breathing action with each arm pull
small change, big difference...

"I had a 6-year-old who kept lifting her head high out of the water to breathe - her legs would drop and she’d stop moving forward. So we practiced just breathing with a kickboard, head barely out. After two lessons, she was gliding along with her head bobbing like a little sea otter. Small adjustments make a big difference!”
For a more in-depth look at breaststroke breathing, click here.
How do you coordinate the arms, legs, and breathing in breaststroke?
This rhythm is the secret sauce of a good breaststroke. And yes, it takes some practice to get it right.
The flow goes like this:
- Pull with your arms
- As you pull, breathe in
- Then do your kick
- Finish with a long glide
That glide? It’s golden. It gives you time to reset and makes your stroke more efficient. Don’t rush it - let yourself stretch out and coast. Allow your natural body position and floating take over.
What can I do in the pool to help coordinate my Breaststroke?
Try this simple step-by-step exercise:
- Push and glide away from the poolside with arms stretched out in front and legs together behind.
- Begin the arm action by pulling around in a circle
- As the arms pull, raise the head to take a breath
- As the head raises, bend the knees to begin the leg kick action
- As the legs whip back and around, submerge the face and stretch and arms forward and together
- The arms and legs to remain straight and together for a glide of around 1 - 2 seconds before the sequence begins again

When you learn breaststroke swimming technique, the timing sequence can be performed as slowly as you need, literally practicing one piece at a time. As you get used to the order of each movement, they can begin to flow into a smooth rhythmical motion.
For more information about different breaststroke timing patterns, click here.
Quick Recap Table
| Part of Stroke | What to Remember |
|---|---|
| Body Position | Flat, straight, hips high |
| Kick | Whip, not wide, feet together |
| Arm Movement | Out – in – forward (scoop motion) |
| Breathing | Let shoulders do most of the lift |
| Timing | Pull → Breathe → Kick → Glide |
Frequently Asked Questions About Breaststroke Technique
Is breaststroke good for beginners?
Yes! Breaststroke is often the easiest stroke to learn because of its slower pace and natural rhythm. It allows swimmers to keep their head above water more often, which helps build comfort and confidence.
What’s the hardest part of breaststroke to master?
For most beginners, timing is the trickiest part. The arm pull, breath, and kick must work in harmony—if one is out of sync, the whole stroke feels awkward. That’s why I teach it in segments before putting it all together.
How long does it take to learn breaststroke?
That depends on age, water comfort, and experience. Total beginners usually grasp the basics in 2–4 lessons, but it takes a few weeks of practice to swim it fluidly. Patience and repetition are key.
Why do my legs sink when I try to swim breaststroke?
This usually means your body position is too upright, or you're lifting your head too high to breathe. Try gliding longer with your arms extended and keeping your head low during inhalation.
Is the breaststroke kick supposed to be wide?
No. A wide kick may feel powerful, but it creates drag. Think of drawing a circle with your heels—then snapping your feet together like closing a book. A narrow, controlled whip kick is much more effective.
Learn Breaststroke Swimming Technique With Loads More Step By Step Drills
The 5 drills outlined here are only a few basics. There are many more in my book 'How To Swim Breaststroke' - drills that you may find easier and drills that will help eliminate some common mistakes. They all come with professional teaching points to ensure that you make progress.
Grab a copy of my book here and learn breaststroke swimming technique the easy way...
I am a member of the Amazon Associates Program and I will earn a commission from qualifying purchases at no extra cost to you.
